V3 DROPPER POST REMOTE INSTALL
- 3mm Hex Tool
- Torque wrench with 4mm bit
- Cable cutters
- T25 Torques tool (SRAM MMX)
- Pick Tool or 2mm Hex (Shimano)

Assembly time, approximately 10 minutes. Difficulty: Easy.
Note: If you are also installing your dropper, or replacing the dropper cable & housing, then you can proceed to the V2 DROPPER INSTALL INSTRUCTIONS
STEP 1: INSTALL COLORED CUSHION (OPTIONAL)
Remove black cushion by lifting the outer corner and pulling towards the barrel adjuster. Take the new cushion, push the side with the cut line (Scissor) into the slot on the lever and slide it outward while also pushing down. Check the back and make sure the cushion seated completely in the slot of the lever.


STEP 2: INSTALL CABLE
Undo the cable lockbolt with your 3mm Hex key enough so you can slide a cable underneath the washer. Turn barrel adjuster all the way in, then back out two full turns. This will give you room to adjust your cable tension either way once the cable is secured to the remote.
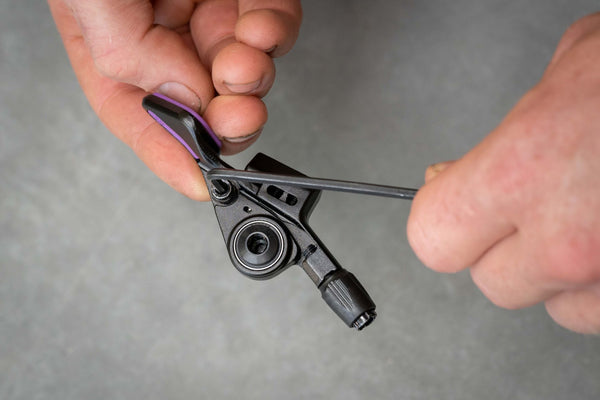
Run cable through the barrel adjsuter and guide it underneath the washer. Pull cable taught, ensuring the housing is seated properly in the barrel adjuster & the lever is tight against the remote body. Tighten cable lock bolt with your 3mm Hex key.

Mark the cable were it lines up with the Cut line (scissors) on the back of the cushion. Cut along that line with your cable cutters.


Crimp cable end onto cable, and slide it into the slot at the back of the cushion.
Note: you can skip the cable end, but it is recommended to protect the rubber from the sharp end of the cable.

STEP 3: INSTALL REMOTE ON BAR
-
Loosely attach the hinged clamp to your handlebar (Left side of brake for SRAM, Right side of brake for Shimano)
-
Attach the remote body to the clamp using your preferred mounting hole.
-
Torque the remote body to the clamp using a 4mm hex to 3Nm
-
Loosen the 22.2mm clamp and rotate the OneUp dropper remote until the remote body is parallel to the brake lever
-
Snug the 22.2mm clamp to 1Nm max.
-
Remove the lever mounting bolt completely from the left brake using a 4mm hex
-
Depress the "Push to Open" button using a 2mm hex to fully open the brake lever clamp
-
Remove the plastic spacer from the inside of the lever clamp
-
Install the OneUp I-spec II adapter into the lever clamp
-
Loosely reinstall the brake lever clamp onto the handlebar
-
Attach the remote body to the I-spec II adapter using your preferred mounting hole.
-
Torque the remote body to the I-spec II adapter using a 4mm hex to 3Nm
-
Rotate the OneUp dropper remote until the remote body is parallel to the brake lever.
-
Torque the brake lever clamp to the manufacturer's recommendation
-
Remove the lever mounting bolt completely from the left brake using a 4mm hex
-
Depress the "Push to Open" button using a 2mm hex to fully open the brake lever clamp
-
Install the OneUp supplied T-nut into the curved recess on the hinged clamp
-
Reinstall the brake lever clamp onto the handlebar
-
Install the OneUp supplied IS-EV adapter onto the T-nut
-
Attach the remote body to the IS-EV adapter using your preferred mounting hole.
-
Torque the remote body to the IS-EV adapter using a 4mm hex to 3Nm
-
Rotate the OneUp dropper remote until the remote body is parallel to the brake lever.
-
Torque the IS-EV adapter bolt to the brake clamp using a 4mm hex to 3Nm.
-
Remove Brake lever mounting screw and hinged clamp using a T25 Torx
-
Install the OneUp supplied T-nut into the curved recess on the hinged clamp
-
Reinstall the brake lever clamp onto the handlebar
-
Install the OneUp supplied Matchmaker X adapter onto the T-nut
-
Attach the remote body to the Matchmaker X adapter using your preferred mounting hole.
-
Torque the remote body to the Matchmaker X adapter using a 4mm hex to 3Nm
-
Rotate the OneUp dropper remote until the remote body is parallel to the brake lever.
-
Torque the MMX adapter bolt to the brake clamp using a 4mm hex to 3Nm.
Congratulations, you have now successfully completed the V3 Dropper Installation.
NOW GO RIDE!
If you are having any problems please first double check that you have correctly completed each of the above steps.
If you are still having trouble please email us at support@oneupcomponents.com for help. Please include a detailed description of your issue. Photos are often helpful.
Thanks,
OneUp